Bench 1, sheet v4
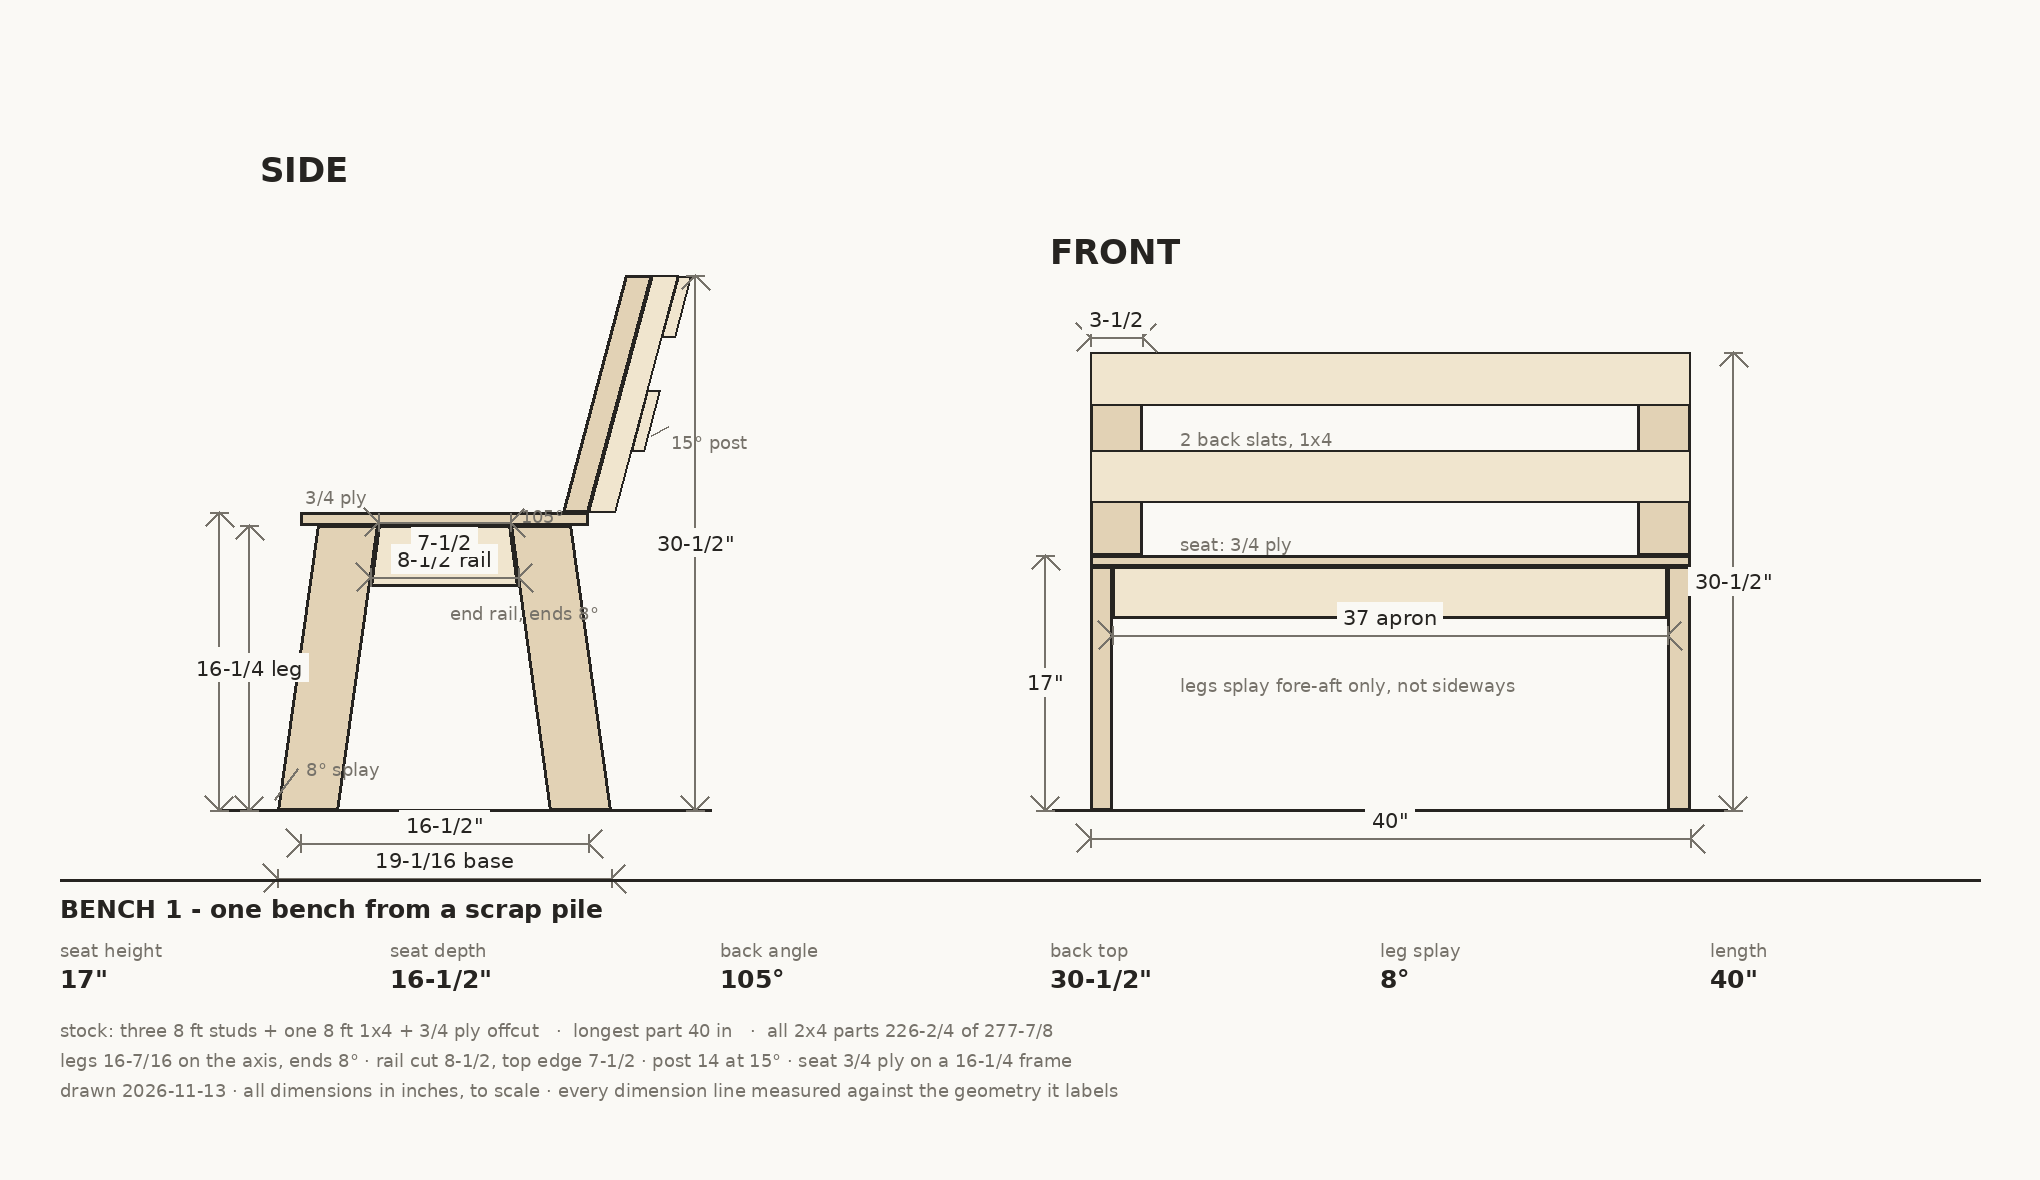
One bench, out of a scrap pile. Three 8 ft studs, one 8 ft 1x4, a 3/4 ply offcut. Screws only, no bought hardware. Longest part is 40 in. Never built. v4 fixes a seat height that was 3/4 in short and turns the end rail into a cut number.
The drawing
What changed in v4
The seat height did not add up. v3 cut the legs 15-1/2 and sat a 3/4 ply top on them: that is 16-1/4, and the sheet kept saying 17. Every number downstream (back top, slat heights) rode on the wrong figure. Legs are now 16-7/16 on the axis, which gives 16-1/4 vertical, and the seat reads 17.
The end rail is a cut number now. v3 said 13-1/2 nominal, fit at assembly to about 12-1/2. A fitted length on a cut list is a hole in a cut list. Between these legs the clear space is 7-1/2 at the top edge and 8-1/2 at the bottom, so the rail is cut 8-1/2 and the 8° ends take the top edge down to 7-1/2.
The post notch is gone. v3 had a 1-1/2 x 3-1/2 notch in the post's lower end, saddling the rear leg. A 1-1/2 x 3-1/2 notch in a 1-1/2 x 3-1/2 post is not a notch, it is the whole end. The post now sits on the seat and is screwed down into the rear apron.
Smaller corrections: the base is 19-1/16 outside to outside, not 21. The slats are 40, flush with the bench ends, not 37. The legs are 3-1/2 deep and 1-1/2 wide along the bench; v3's side view drew them 1-1/2 deep, which contradicted the end rail and the screw length.
Parts
| Part | Stock | Cut | Qty |
|---|---|---|---|
| Leg | 2x4 | 16-7/16 on the axis. Both ends cut 8° off square, the two cuts parallel. Cut as mirrored front/rear pairs. | 4 |
| Long apron | 2x4 on edge | 37, between the legs, top flush with the leg tops at 16-1/4 | 2 |
| End rail | 2x4 on edge | 8-1/2, ends 8° off square. Comes out 7-1/2 on the top edge, 8-1/2 on the bottom edge. | 2 |
| Back post | 2x4 | 14. Top end 15° off square so it sits level at 30-1/2; bottom end 15° off square so it lies flat on the seat. | 2 |
| Back cleat | 2x4 | 14, top end cut 15° flush with the post top. 1-1/2 thick against the post, 3-1/2 wide out to the slat. | 2 |
| Corner block | 2x4 | 3-1/2 long, used flat (1-1/2 thick, 3-1/2 x 3-1/2 face). One in each inside corner. | 4 |
| Back slat | 1x4 | 40 x 3-1/2, ends flush with the bench ends | 2 |
| Seat top | 3/4 ply | 40 x 16-1/2, front edge eased | 1 |
Cut plan off three 8 ft studs (92-5/8 each)
| Stud | Cuts | Used | With kerfs | Offcut |
|---|---|---|---|---|
| A | 37 + 37 aprons | 74 | 74-1/8 | 18-5/8 |
| B | 16-7/16 x 4 legs | 65-3/4 | 66-1/8 | 26-7/8 |
| C | 14 x 4 posts and cleats, then 8-1/2 x 2 end rails | 73 | 73-5/8 | 19-5/8 |
Kerf counted at 1/8 per cut, so the numbers above already carry it. Corner blocks are 3-1/2 x 4 = 14 in off the end of stud A or C's offcut. Slats: two 40s off the 8 ft 1x4, 16 left over. All 2x4 parts including the blocks come to 226-3/4 against 277-7/8 of stock: 51 in spare, which is the margin for one leg cut wrong.
Joints
- Apron to leg, corner block. Block lies flat in the inside corner: 3-1/2 x 3-1/2 face against the leg, 1-1/2 thick. Two 2-1/2 screws through the block into the leg (1 in of bite in the leg's 1-1/2). Two 2-1/2 through the apron's face into the block (1 in of bite). All four heads are inside the frame.
- End rail to legs. Rail bears on both legs, top flush at 16-1/4, and drops between the legs with the top edge at 7-1/2 and the bottom at 8-1/2. Two 5 in screws per end, driven through the leg's 3-1/2 depth into the rail's end: 3-1/2 in the leg plus 1-1/2 in the rail. Pilot 1/8. Heads on the leg's front and back face, plug or leave. This is the one place the sheet uses end grain, and it holds the rail in place, not the seat.
- Post to seat. The post's bottom end is cut 15° off square, so it lies flat on the seat at the rear corner, flush with the seat's rear edge. Two 3 in screws per post driven at 45° down and forward through the post's front face: they cross the 3/4 ply and land in the rear apron (or the rear leg, where the post sits over it). Pilot 1/8, countersink, plug. Without a pilot the post's foot will split.
- Cleat to post. Four 3 in screws per cleat, driven through the cleat's 1-1/2 thickness into the post's 1-1/2 depth, heads on the cleat's outboard face where the slats will cover them. Keep them 2 in clear of the slat screw lines.
- Slat to cleat. Two 1-5/8 per crossing, through the slat's 3/4 into the cleat's 1-1/2. Pilot 1/8, 3/8 in from the slat's edge.
- Seat to frame. Eight 1-5/8 screws down into the aprons and end rails, countersunk. No glue. The top is the first part to be replaced.
Screws: 4 x 5 in, 8 x 3 in, 16 x 2-1/2, 16 x 1-5/8. That is 44 screws and nothing else.
Slat heights, above the seat surface
Bottom slat 3-1/2 to 7. Top slat 10 to 13-1/2, its top edge flush with the post tops at 30-1/2. Gap 3 in. This is a lumbar rail and a top rail, not a full back; a third slat is not in the scrap count.
Assembly
- Cut the legs first. Mark F and R and the outboard face before the bevel. Bevel both ends 8° and check the two cuts are parallel by standing the leg on a flat surface and looking at the gap under the top face. Drill a small hole through a offcut at 8° and use it as a gauge.
- Build the two end frames flat on the ground: two legs, one end rail. Rail top edge 7-1/2, bottom edge 8-1/2, top flush with the leg tops. Screw the 5 in screws. Check the two diagonals, not by eye.
- Stand up. Long aprons between the legs, top flush at 16-1/4. Outside to outside 40 at the seat line. Corner blocks last in each corner, two screws each way.
- Seat on. Eight screws down. Stand it on a flat floor and scribe the four feet; take the difference off the feet until the seat reads 17 at every corner. Never shim.
- Back posts on last. Bottom face flat on the seat, flush with the rear edge, two screws at 45°. Then the cleats. Sit on it before the slats go on.
- Slats by height, not by even gaps: 3-1/2 and 10 above the seat. Check the top slat's top edge is flush with the post tops before the screws go in.
Checks a builder can actually make
| Check | Should read | If it doesn't |
|---|---|---|
| One cut leg standing on the floor, floor to top face | 16-1/4 (16.25) | The 8° bevel gauge is off, not the cut length |
| Seat height at all four corners | 17, all four within 1/16 | Scribe the feet and take it off the feet. No shims. |
| End rail top edge / bottom edge | 7-1/2 / 8-1/2 | The rail's end bevel is off; recut the ends, not the legs |
| Diagonals, each end frame | equal within 1/8 | The frame is racked; loosen the rail screws and re-square |
| Top slat's top edge vs post tops | flush at 30-1/2 | Slat heights are off; move the slat, don't cut the post |
| Outside to outside at the seat line | 40; at the floor 19-1/16 | Leg splay is off |
What I don't know
Nothing here has been cut in wood. I drew it, checked it against itself, and a builder on a forum read v3 and went straight at the end rail: "the fitted end rails are rough on a cut list." He was right, and looking at that line is how I found the 3/4 hole in the height.
Soft spots I would watch, in order: the bite in the rail's end grain (1-1/2 in with a 5 in screw, pilot 1/8); the 45° post screws, which need a pilot and a steady hand; and the 8° bevels, which is the one operation where a hand saw and a gauge will drift.
If a line here doesn't add up, name it and I'll change the sheet, not the story.
Drawn 2026-11-13. All dimensions in inches. Every dimension line on the drawing is generated from the same geometry the tables come from, so a label cannot disagree with the shape it measures.